Education
Creating Linux Symbol Tables for Volatility: Step-by-step guide
This post explores how Volatility 3 works, what Symbol Tables are, and how you can go about creating them.

Odysseus (c4n0pus),
May 20
2025

Volatility was launched in 2007 by the Volatility Foundation and since then, it has grown to become the most advanced memory analysis and memory forensic framework in its category.
The original name of the project was Volatility 2 (and before that there was Volatility 1, and FATKit, but it was with Volatility 2 that a holistic framework emerged), and it was written in Python 2. In February 2020, Volatility 3 v1.0.0 was released, written in Python 3, was heavily optimized and countered many of the issues that came with Python 2.
For the last couple of years, development has fully shifted into the rewrite of the project with the team designating recently released (at the time of writing) version 2.26.0 as the ‘Feature Parity Release’, thus deprecating Volatility 2.
In this post, we explore how Volatility 3 works, what Symbol Tables are, and how you can go about creating them. Let's get started.
Table of Contents
Volatility 2 vs Volatility 3
With Python 3 becoming the default Python version for most distributions, and Python 2 reaching EOL (End-Of-Life), installing and working with Volatility 2 has been troublesome.
The community has seen many instances where players couldn’t work with a (Linux) memory snapshot because it was created with Volatility 2 in mind, thus a profile (Volatility 2 equivalent of Symbols) was provided rather than an ISF (Intermediate Symbol File), as a result making it a Volatility 2 (only) challenge.
As you may have guessed, the current standard and recommended version is Volatility 3. Because of that, I will be referring to ‘Volatility 3’ as plain ‘Volatility’ for the rest of the post.
For the x86 architecture, Volatility can analyze images for Windows, Linux and older macOS. On the aarch64 side of things, there is a lot of effort being put in by the community to bring Arm support to the project, but there’s still a long way to go.
This would enable analyzing snapshots from Android too; the only caveat for macOS is that (free) memory acquisition is only supported with a virtualized Guest, whereas there are paid solutions that support live systems.
How it works
Volatility encompasses a range of techniques and tools for analyzing memory images, which is a direct result of immense Linux and Windows Internals research, and experimentation. From an end-user’s perspective—and at a very high level—it’s organized into plugins, each of which have a very limited scope and a very precise functionality.
This will not be a Volatility deep-dive, since it’s out of the focus of this post, but we will go over some of the basics in a really high-level, abstract manner, so we can connect everything together. If you want to read more about it, you can visit the official documentation.
The single most powerful feature of Volatility is the ability to explore a memory snapshot and by employing a great deal of tools, it provides the developer (of said plugins) with functionality such as:
-
Display and interact with data structures
-
Read arbitrary memory locations
-
Follow pointers to their location or dereference them
-
Cast objects to different data types
-
Seamless interaction between Virtual and Physical objects/memory
Additionally, this functionality can be used in an interactive manner with the use of Volshell, which you can read more about here.
This abundance of freedom and utilities is what allows the aforementioned plugins to be built in the first place and to have such precise functionality and also provides a very usable API for others to develop plugins for the project, or use it as a library.
But in order for the framework to provide us with such freedom, it needs to be able to understand a variety of memory acquisition types and methods. To name a few:
-
Raw
-
ELF
-
VMware
-
LiME
-
Dumpit
For the aforementioned functionality to be implemented, the memory dump must be processed into a format that is platform-agnostic!
Demystifying layers
The above memory acquisition methods produce different types of memory snapshots, but they all contain the same data: The Physical Memory of the Machine, just in a different format.
The runtime context is organized into Layers. Volatility uses these layers to process different memory snapshots in order to arrive at a position to be able to explore this physical memory. Much like audio files, some of them are compressed, some raw, but basically contain the same information; samples in the time/frequency domain that get interpolated by the media player (DAC) to produce sound (albeit some files contain more information than others).
Think of Layers like a container of addresses, data, implemented functions and utilities for the specific file format that can help Volatility perform operations and allow the framework to access different information in the same manner. Some of the most predominantly used Layers and their usage:
-
Physical (Contains the Physical Address Space: ELF, RAW, VMware, LiME)
-
Virtual (Contains Virtual Addresses (and their Data))
-
File Layer (Responsible for operating on the snapshot file)
-
Swap (Implements analysis for the swap partition)
More on this in the example later on.
These layers are constructed using a “Bottom to Top” approach, diverging when specific functionality needs to be abstracted and implemented elsewhere (i.e., Raw vs ELF snapshots), where a new Layer is created to handle said functionality, and then converge again.
Each new Layer has a dependency of the Layer below it, but sometimes layers may have multiple dependencies, so we end up with a Tree graph of dependencies (rather than a single stack). This pattern continues until we can successfully create the Kernel Layer.
The Kernel Layer is just a Virtual Layer (a layer that contains virtual addresses), but the most important one, since it’s the core component of any system, and also a hard requirement for almost all the plugins. Meaning this layer needs to exist when the plugin runs, If we cannot create this layer, ie: because of no symbols, then the plugin cannot continue and terminates!
Note: The above, and the diagram below, are a very simplified representation of the runtime’s organization. A lot could vary (intermediate layers, missing layers, different names), depending on memory acquisition methods (VMware, Leechcore, LiME, etc) and also across Architectures. This is just to illustrate where symbols are used, and why they are so critical.
Below, we can see the different Layer Tree for two different memory snapshots, one ELF, one RAW:
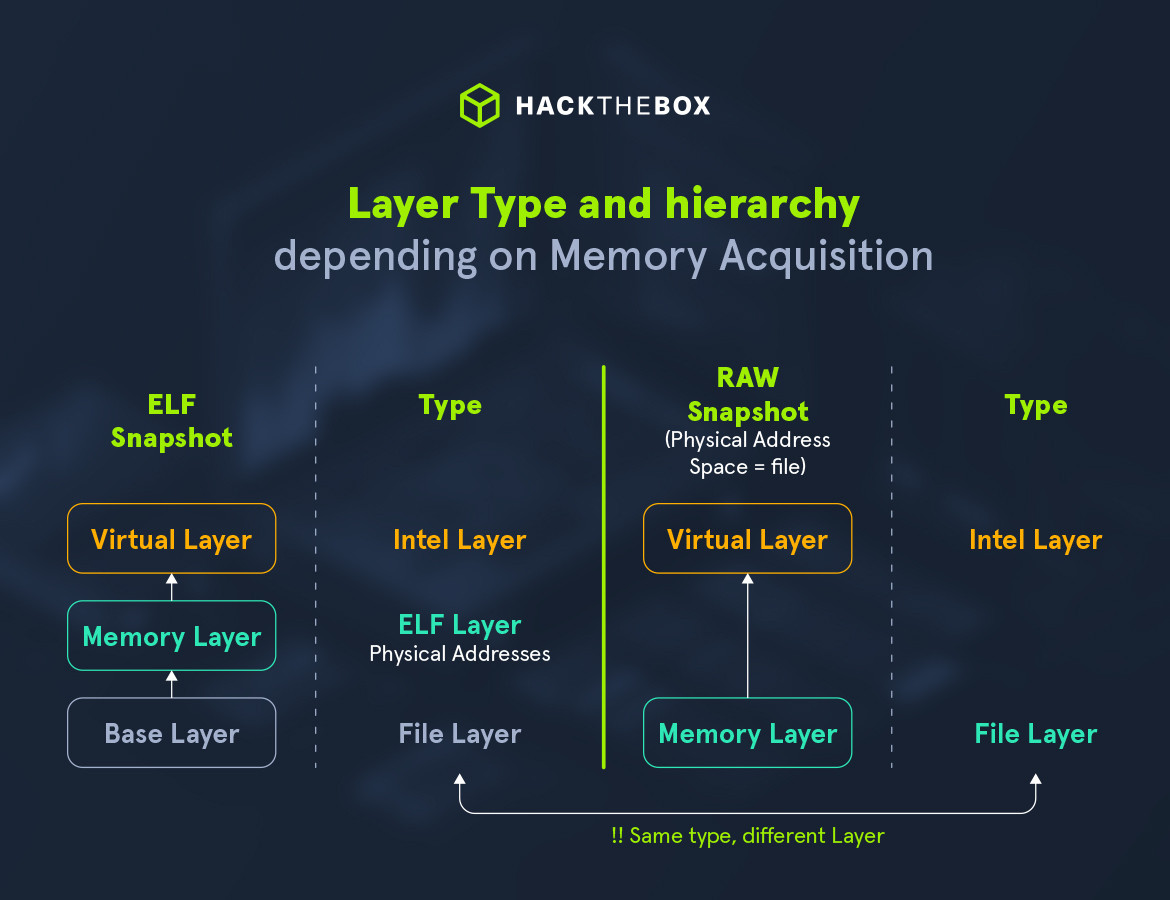
Notice the Types of each layer! For the ELF snapshot, the base layer type is of File Layer. However, for the RAW memory dump, since the file itself is the Physical Address Space, there is no need for an intermediate layer. This is the divergence we talked about earlier, and finally they converge again to create a Virtual Layer! We can inspect each type interactively using Volshell:
For a RAW memory dump:
(layer_name) >>> list(self.context.layers)
['memory_layer', 'layer_name']
(layer_name) >>> self.context.layers['memory_layer']
<volatility3.framework.layers.physical.FileLayer object at 0x7be0db01ccd0>
(layer_name) >>> self.context.layers['layer_name']
<volatility3.framework.layers.intel.WindowsIntel32e object at 0x7be0db01da90>
(layer_name) >>>
And for an ELF one:
(layer_name) >>> list(self.context.layers)
['base_layer', 'memory_layer', 'layer_name']
(layer_name) >>> self.context.layers['base_layer']
<volatility3.framework.layers.physical.FileLayer object at 0x756b3dbe5d10>
(layer_name) >>> self.context.layers['memory_layer']
<volatility3.framework.layers.elf.Elf64Layer object at 0x756b3d77d310>
(layer_name) >>> self.context.layers['layer_name']
<volatility3.framework.layers.intel.Intel32e object at 0x756b3d77df90>
(layer_name) >>>
We can also create more Virtual Layers for each process we want, so we end up with a fan-out diagram like so:

Memory mapping
In order to be able to scan the memory, Volatility must first be able to address a continuous (and arbitrary) section of memory both at the Virtual (for every process and the Kernel) and at the Physical level.
You can think of Volatility as a really powerful Memory Mapper, mapping each process’ (and kernel’s) Virtual Memory onto the Physical memory. This mapping table is constructed each time the framework is initialized! A very simple example of a mapping table can be found in the official Volatility Docs
A worked example
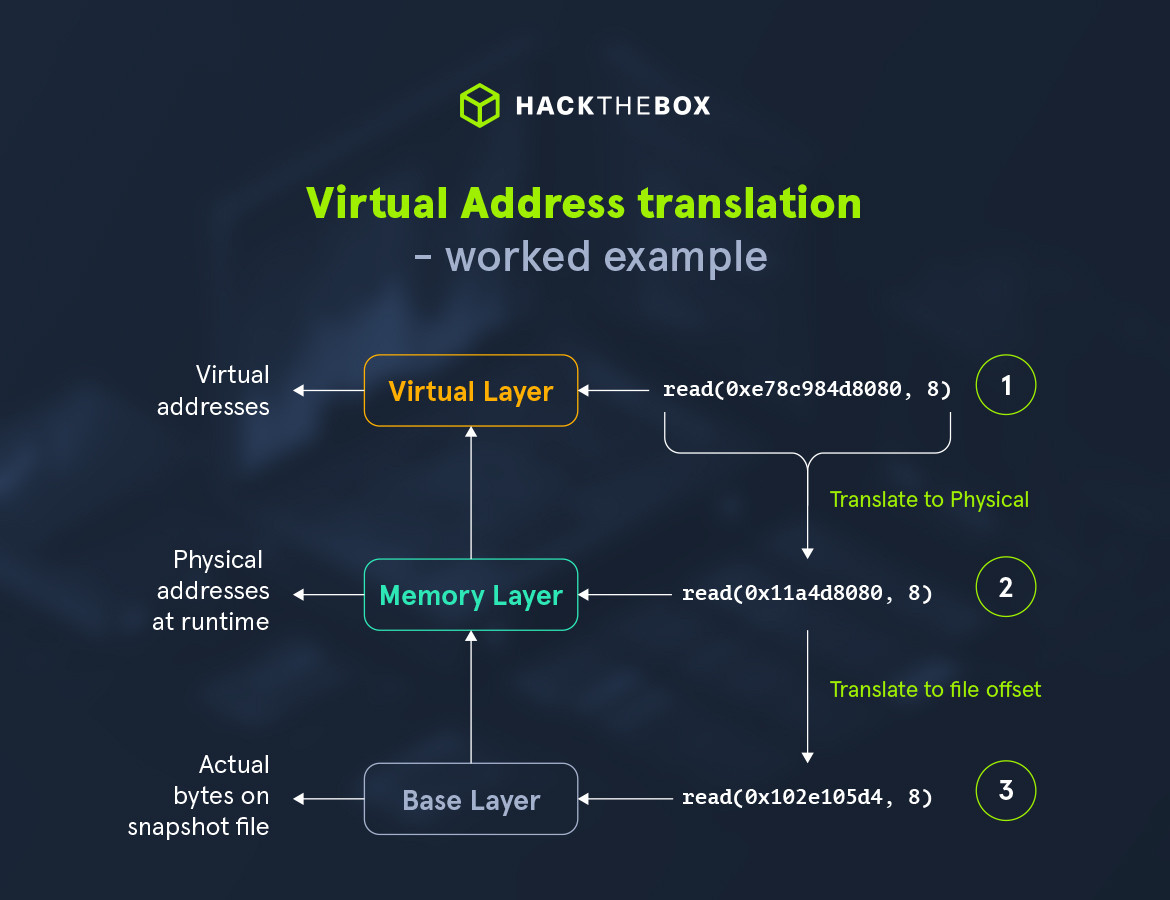
Now that we talked about Layers, physical and virtual memory, let’s check out an example on how will Volatility behave when a read() is invoked on a virtual address:
-
A
read()function is called, trying to read 8 bytes from an address in a Virtual Layer -
The virtual address is translated into the corresponding address of the below Layer, in this case a physical address. This translation happens using the
layer.mapping()method. -
In turn, because the snapshot is an
ELFone, Volatility translates the physical address again, to reach the actual data on the file.
Had this been a RAW snapshot, there would not have been a second translation because the Physical Layer IS the file itself.
Symbol tables
Once the memory map has been figured out, and we know how to process different snapshot types, Volatility needs to create the Kernel Layer we mentioned above.
In order to create said Layer, we first need to construct the Kernel’s objects, on top of the Kernel’s address space, and for that, we need to know two things:
-
What is the offset (Location)
-
What is the Structure Layout (Template)
These two pieces of information lead us to the subject of this post: Symbols.
A Symbol is a named location in memory that can be described by the above tuple. The symbol table contains the offset of each symbol from the Kernel’s mapped address and its structure with the name of the object being used for looking up this pair of information.
A wonderful way of looking at things here is using the cookie cutter analogy. The templates are the cookie cutters, the dough is the layer on which we wish to construct the object, the offset is where on the dough we place the cookie cutter, and objects are the resulting cookies cut from the dough.
On Windows, obtaining the Kernel Symbols is relatively easy since they are published by Microsoft themselves in PDB (Portable Debugger) packages.
On startup (using a Windows Memory Dump), Volatility will firstly identify the Kernel’s offset in memory and then download the appropriate version of the Kernel symbol package: ntkrnlmp.pdb:

Ntkrnlmp.exe stands for NT Kernel Multiprocessing which, similarly to ntoskrnl.exe (NT OS Kernel), is the core Kernel Component for multiprocessing systems, while the latter is for Single CPU systems and also serves as the generic name for the Windows Kernel.
Now that we have the kernel’s base address and also a corresponding Symbol Table, we can now start creating objects ad-hoc.
That’s good and all, but this blog post is about Linux Symbol Tables, not Windows. On the Linux side, things are a bit (a lot) more complicated! Since there are so many Linux distributions and between them, and their other countless flavors, the core component mentioned earlier, being the Kernel, differs.
Well, that is an understatement; it’s completely different in all aspects, these being: versions, symbol location, even functionality and syscalls. Storing this information somewhere would require huge effort, not only on storage aspects, but mainly, keeping up with releases.
There is an effort being made by Abyss Watcher to populate a repository with symbols from well known distributions.
Creating symbol tables
Linux Kernel packages come with a stripped Kernel to save space, with an optional Debug Package that contains the DWARF debug information. (Fun fact: It’s thought that DWARF is a complement to the ELF file format). The project dwarf2json is responsible for parsing this DWARF information and creating a json file containing the symbols (name, template, offset) that volatility parses to construct the aforementioned Kernel Layer.
Generally speaking, the simplest and most fail-safe way to obtain (any) DWARF information is by compiling the Kernel (on a specific version/commit) and enabling debug symbols. This will create a Linux binary containing the DWARF information.
If we download an arbitrary kernel source and configure CONFIG_DEBUG_INFO=y and build it, it will produce an unstripped vmlinux binary that we can pass into dwarf2json in order to create our symbols. However, this approach is costly both in time spent identifying, downloading and compiling the kernel, and also in space (lots of it).
Thankfully, all major distributions build this package in their CI/CD pipeline, and it’s available in their repositories:
For us who are using Arch Linux (btw...), the best I could find for obtaining the debug Information is by manually building the Kernel and including the Debug Information there (by modifying PKGBUILD). More information about Arch Specific use-cases here.
Disclaimer: Before we move any further, I want to clarify there are many approaches in creating symbols, however in a CTF Context, I believe the following methods are the easiest. Speaking from a Challenge Author perspective, If we ever create a challenge that requires the player to create such symbols themselves, it’s (hopefully) going to be simple and straightforward. In the sense that the Linux distro used is not going to be obscure, and ancient, making it difficult to find a debugging kernel. All this to say that the challenge will not be about creating symbols, but this is just to add another step unless hinted otherwise (part of a larger lab, etc.)
The (most) manual approach on a live system
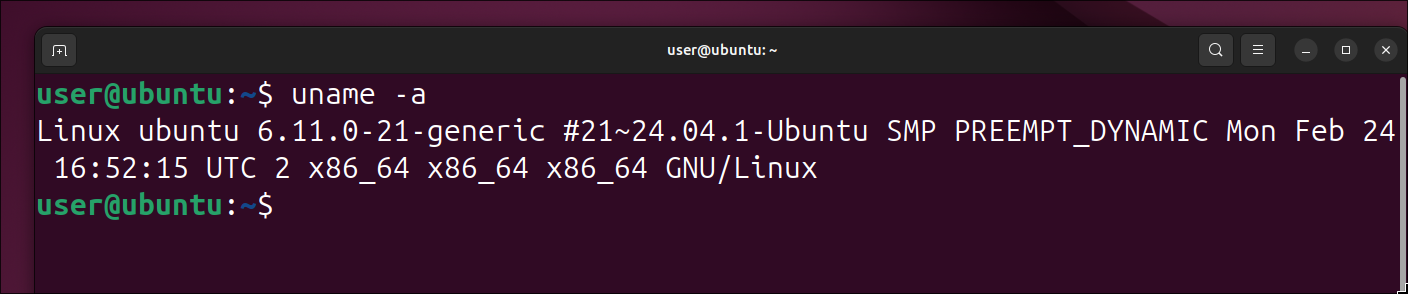
For this demonstration, I will be using an Ubuntu 24.04.1 LTS Virtual Machine in VirtualBox:
Let’s grab the memory sample while we’re at it, and see what happens if we don’t have any symbols. To dump a Volatility compatible Memory Image, we can easily do it in one of two ways:
-
As shown here, launch Virtual Box with DEBUG enabled, and in the debug console run:
.pgmphystofile [filename] -
In a terminal window of the Host system run:
VBoxManage debugvm [VM Name] dumpvmcore --filename [filename]
The former method dumps a raw image, while the latter dumps an ELF formatted image, both compatible with Volatility.
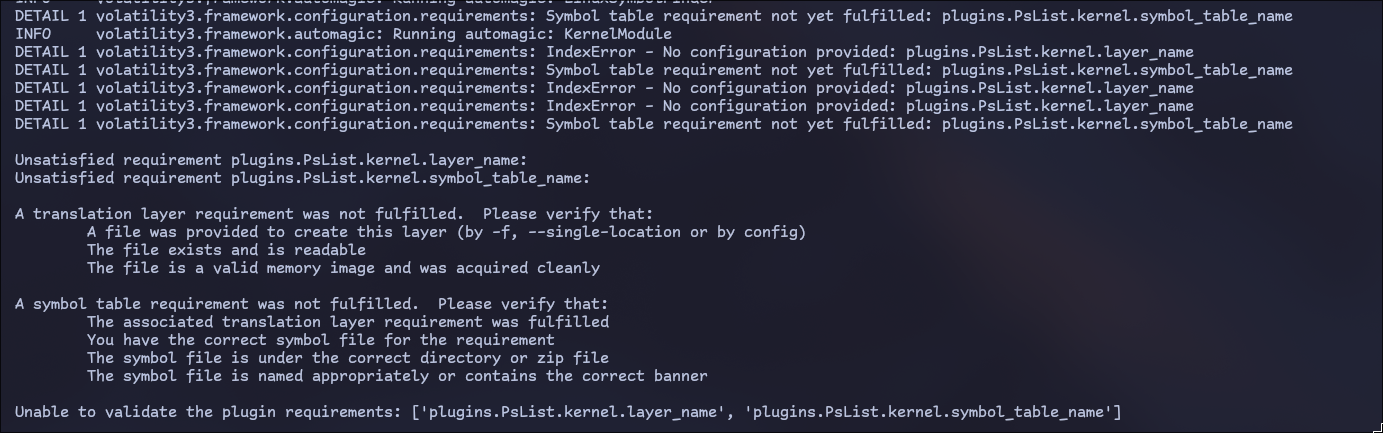
The plugins run on an already constructed context (set of Layers, configuration), and they define a list of requirements that need to be met by the time they run! You can read more on plugins here.
Recalling what was previously said about the Kernel Layer, this is the error we are getting about the unsatisfied requirement, because the Layer could not be constructed (due to missing symbols) so the plugin terminates.
So back to our VM, we need to install the debug symbols for our kernel. Following the documentation provided by Ubuntu, we need to firstly install the keyring, configure the sources and then update our package list.
After following the instructions, we can now install the debug (.ddeb) package:

As you can see, the Kernel debug package is huge, and it depends on the kernel version (the kernel version you use to boot the system). The debug kernel is installed under /usr/lib/debug/boot/:

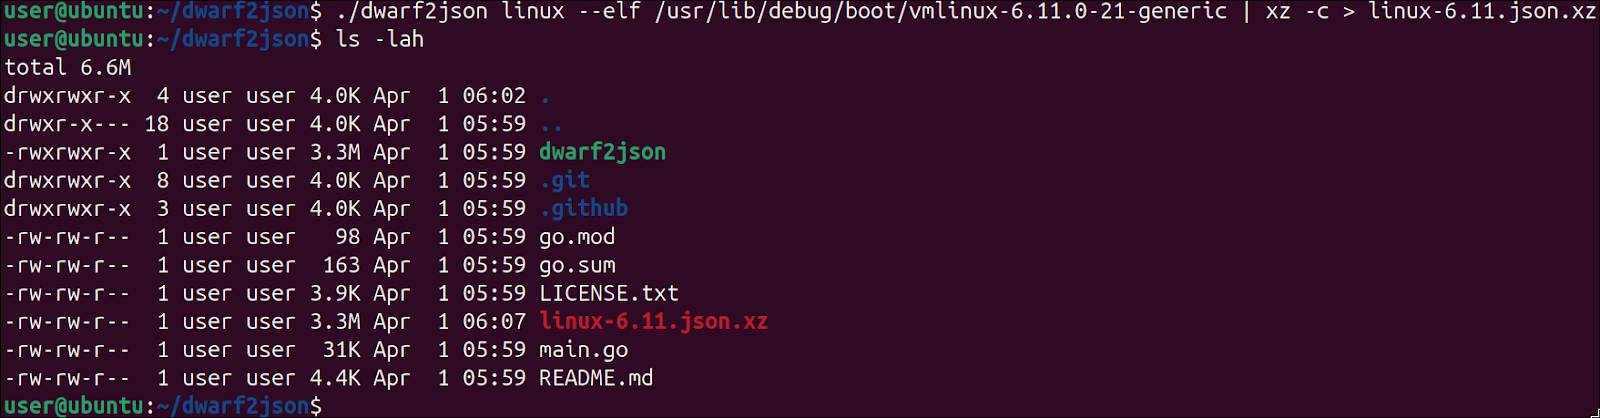
We now use dwarf2json in order to create the ISF. We need only to point it towards the Kernel ELF file that contains the symbols. Since the resulting file is a rather large json, we can also compress it using xz:
If all went well, we can transfer the result ISF to our host machine and use it to examine the snapshot we grabbed earlier:
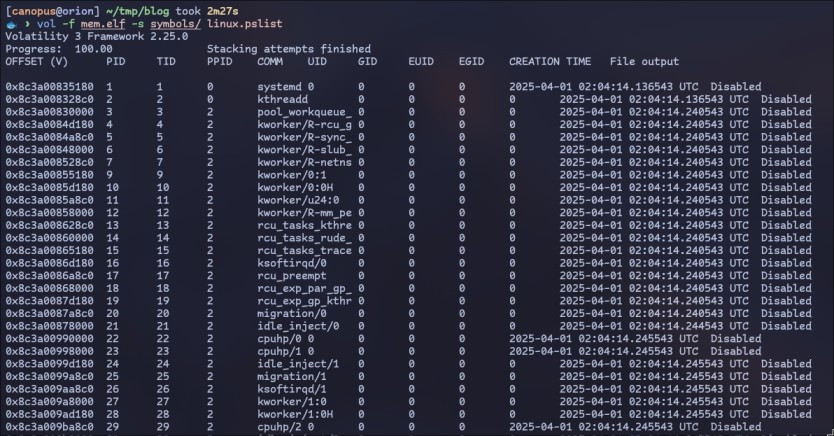
Note the -s argument. It accepts a directory, and Volatility will scan it for all possible symbols (and extract them), so a heavily populated directory will heavily hinder performance.
And there we have it! Well, almost. Creating a VM for each memory dump is really tedious and counter-productive, and don’t forget, we did this while knowing the Kernel version.
Another (less) manual method
Instead of creating a VM for each distro and installing the specific kernel, we can instead download the debug package by itself, extract it, and call dwarf2json on it, to create the ISF. We will create the symbols without having to create a Virtual Machine nor installing a specific kernel with its specific debug symbols.
The same principle applies to basically every distro out there (given there is a debug kernel package available), with the recipe being boiled down to:
-
Identify memory dump kernel version and Linux distribution
-
Navigate the package repository and download the debug kernel package
-
Create the Symbols
To figure out the kernel version of the image, we can use the banners.Banners plugin, which scans the image for strings matching the uname -a format:

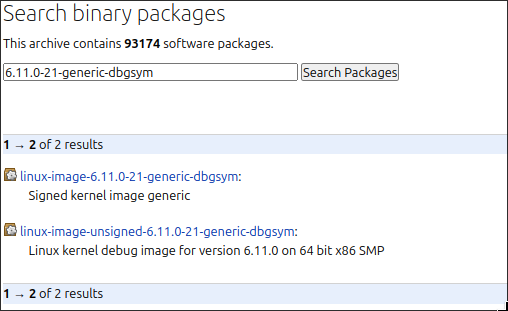
We can identify the Kernel version as 6.11.0, the build number as 21-generic and the Ubuntu version as 24.04.1 (LTS). From there, we can navigate to Launchpad, and then to the Ubuntu package repository, and search for the specific kernel version and build number (-21-generic):

Note: Make sure you select the Ubuntu version before searching, in order to limit the packages to your specific version and avoid duplicates across Ubuntu Versions.
The signed (debug kernel) package will normally have a dependency on the unsigned package:
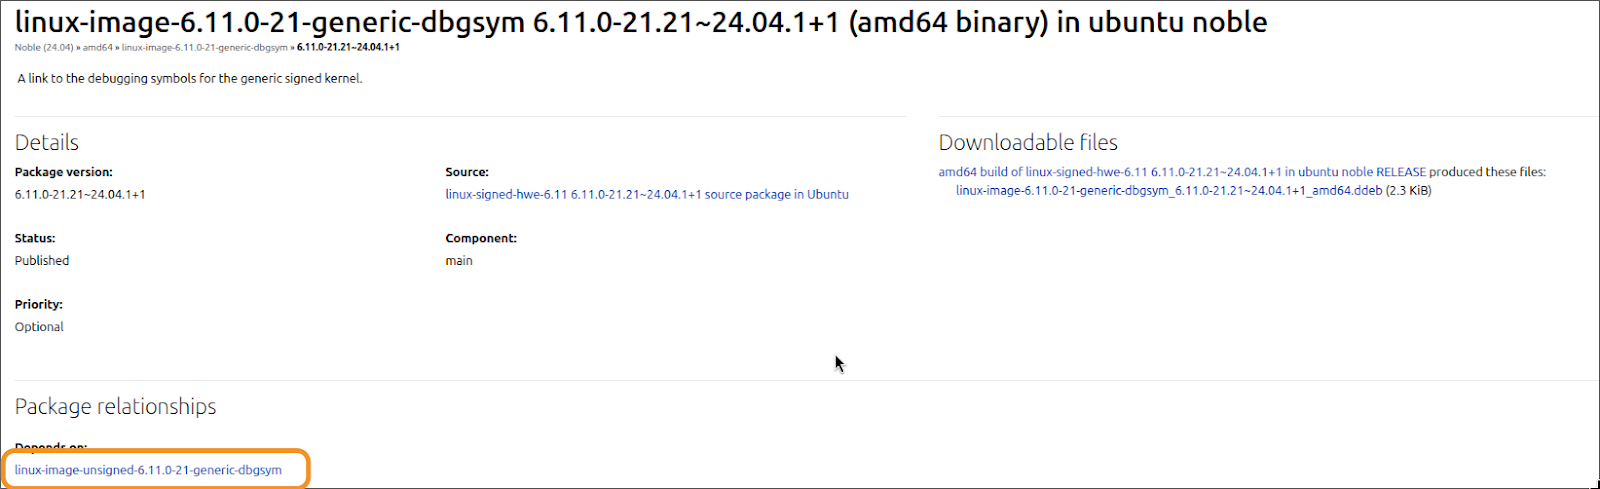
So evidently, the package we need to download is the unsigned version, which provides linux-debug. It’s also about the size we would expect for a debug kernel (given the package we downloaded in the previous section):
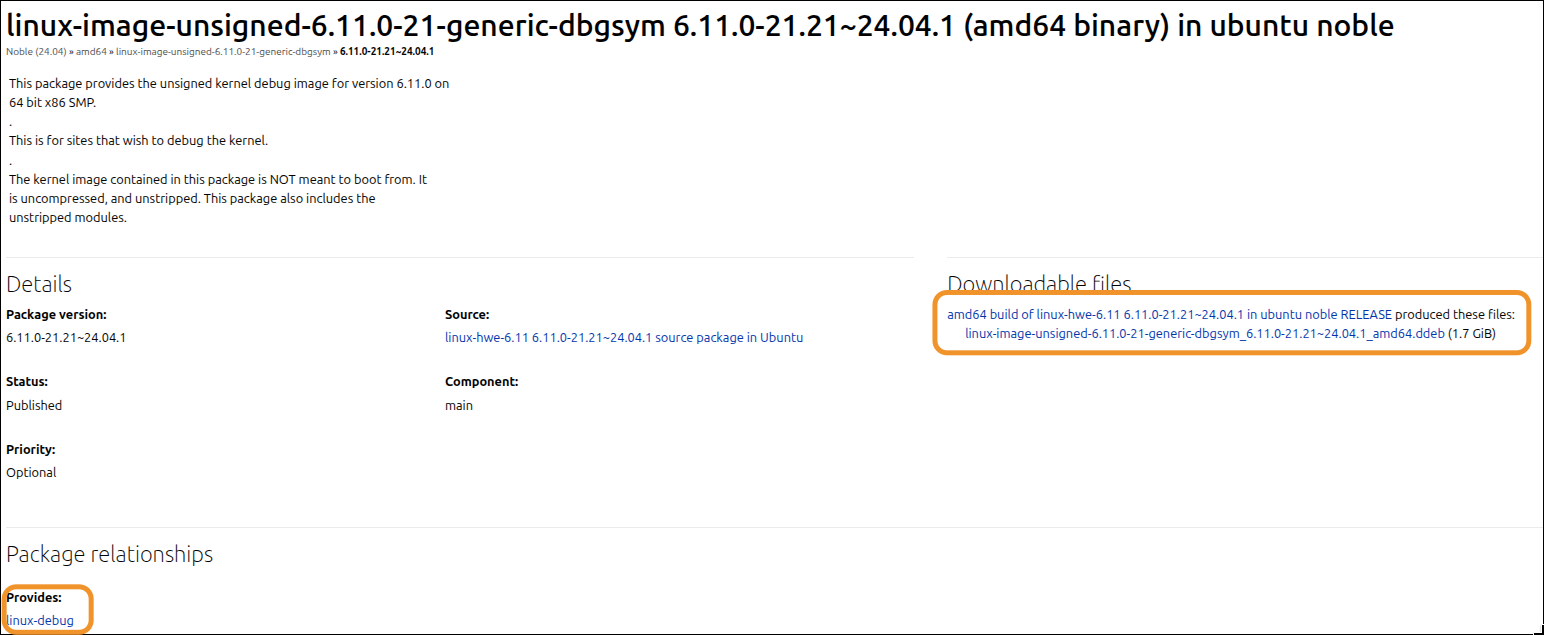
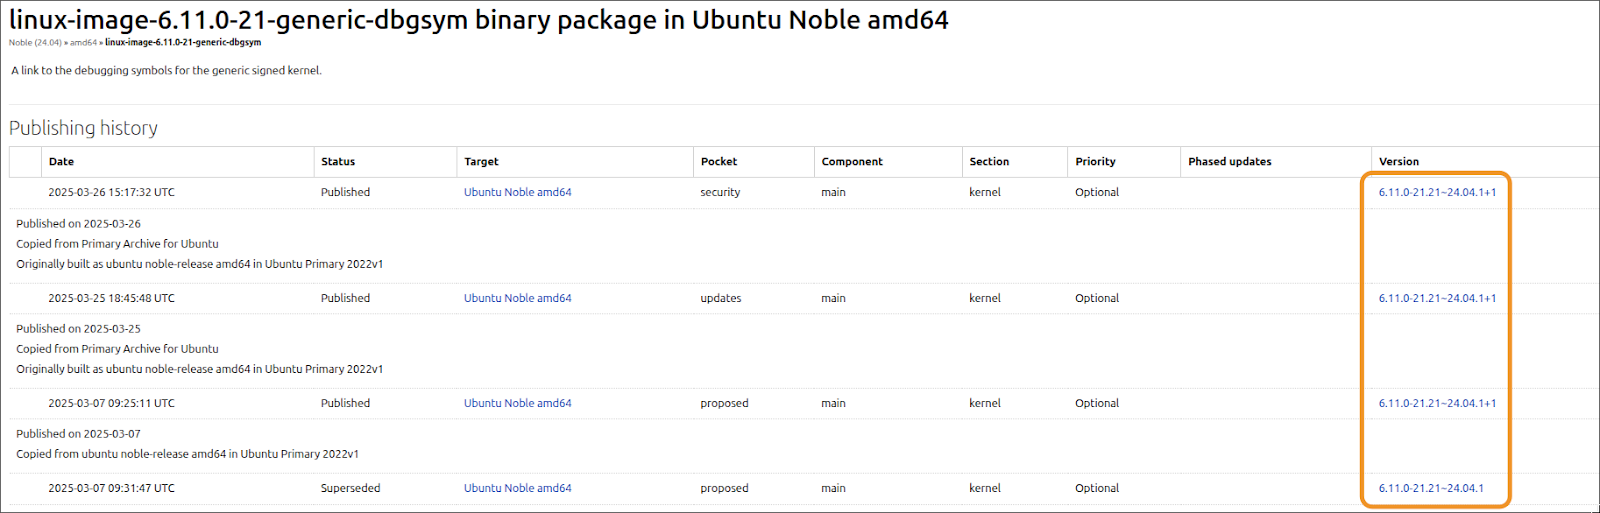
Also, another point worth mentioning, is that, if you arrive at the package page, they may be different versions for the same kernel version for the same Ubuntu release! We will need to select the version that matches our banner output:
Once downloaded, we can extract it using dpkg -x [package name] [output dir] and use dwarf2json as mentioned earlier to create the ISF:
$> dwarf2json linux --elf [output dir]/usr/lib/debug/boot/vmlinux-6.11.0-21-generic | xz -c > linux-6.11.0_local.json.xzThe same principle would apply had we used a package from Fedora or Debian. Just extracting it and pointing dwarf2json to the kernel binary.
Somewhat automated procedure
However, challenges remain. Specifically, if you tried the above steps you may have noticed that Launchpad is notoriously difficult to navigate, let alone for older versions. For this reason, if we are dealing with an Ubuntu memory dump, we can use this amazing script by Abyss-Watcher to fetch the correct kernel package for us!
We need only to pass the whole output of banners to it, and it will find the proper kernel version from Launchpad and provide us with the much-needed instructions:
$> python ubuntu_symbols_finder.py 'Linux version 6.11.0-21-generic (buildd@lcy02-amd64-097) (x86_64-linux-gnu-gcc-13 (Ubuntu 13.3.0-6ubuntu2~24.04) 13.3.0, GNU ld (GNU Binutils for Ubuntu) 2.42) #21~24.04.1-Ubuntu SMP PREEMPT_DYNAMIC Mon Feb 24 16:52:15 UTC 2 (Ubuntu 6.11.0-21.21~24.04.1-generic 6.11.11)'


https://launchpad.net/ubuntu/plucky/amd64/linux-image-unsigned-6.11.0-21-generic-dbgsym/6.11.0-21.21~24.04.1
https://launchpad.net/ubuntu/oracular/amd64/linux-image-unsigned-6.11.0-21-generic-dbgsym/6.11.0-21.21~24.04.1
https://launchpad.net/ubuntu/noble/amd64/linux-image-unsigned-6.11.0-21-generic-dbgsym/6.11.0-21.21~24.04.1

Debug symbols should be available at http://launchpadlibrarian.net/778665928/linux-image-unsigned-6.11.0-21-generic-dbgsym_6.11.0-21.21~24.04.1_amd64.ddeb.

Here is a typical procedure to create the ISF :

wget http://launchpadlibrarian.net/778665928/linux-image-unsigned-6.11.0-21-generic-dbgsym_6.11.0-21.21~24.04.1_amd64.ddeb

dpkg-deb -x linux-image-unsigned-6.11.0-21-generic-dbgsym_6.11.0-21.21~24.04.1_amd64.ddeb linux-image-unsigned-6.11.0-21-generic-dbgsym_6.11.0-21.21~24.04.1_amd64/

dwarf2json linux --elf linux-image-unsigned-6.11.0-21-generic-dbgsym_6.11.0-21.21~24.04.1_amd64/usr/lib/debug/boot/vmlinux-6.11.0-21-generic | xz > linux-image-unsigned-6.11.0-21-generic-dbgsym_6.11.0-21.21~24.04.1_amd64.json.xz
Some general caveats
While testing a Fedora memory dump, it became clear that I had to use the System.map alongside the Kernel binary in dwarf2json, in order to resolve some conflicts and get a working symbol file, as described in the project’s Github.
Specifically for Fedora, the nomenclature for the kernel package (which also contains System.map) is kernel-core-<version>-<release>.<arch>.rpm as found here and for the Debug Kernel is kernel-debuginfo-<version>-<release>.<arch>.rpm as found here.
This is because the debug kernel may contain only the template of the objects, and as you may recall from earlier, we also need the offset of each template. The offsets are found in the System.map file (and at runtime under /proc/kallsyms)
All of this means that when we have the correct kernel version, the debug binary may not be enough.
Another crucial thing to remember is that Volatility compares the banners found in the ISF with the banners found in the snapshot, and they need to match.
Compiling the Kernel, even from the same commit, will cause a banner mismatch, because the compile time is included in the banners. This validation is a safety feature because the kernel structures change depending on source code and configuration. You can read more about such issues here.
An experimental route
As you have probably noticed, hunting down the correct kernel version and hoping there is a debugging package available is somewhat cumbersome.
Enter, BTF (BPF Type Format). It’s a section (.btf) inside the kernel binary that contains debug information about BPF programs.
In this super informative blog post, Valentin Obst explains how this information can be used, in conjunction with the System.map file to create the ISF without downloading the debug kernel, all explicitly with just the memory dump.
However, this entails we extract the vmlinuz/bzImage and System.map/kallsyms from the memory dump, something that greatly diverges from the scope of this post, and also requires some manual work!
So, in turn, we will showcase it by downloading the release kernel for an Ubuntu 24.10 image, and creating the symbols in the same way as we would, had we extracted the kernel from the memory dump.
As mentioned earlier, we run the banners plugin to search and display the Kernel information, and then we download the release package:
-
linux-image-unsigned-6.11.0-21-generic_6.11.0-21.21_amd64.deb
-
linux-modules-6.11.0-21-generic_6.11.0-21.21_amd64.deb (Contains
System.map)
Since the Linux Kernel comes compressed in the form of a bzImage:
$> file vmlinuz-6.11.0-21-generic

vmlinuz-6.11.0-21-generic: Linux kernel x86 boot executable, bzImage, version 6.11.0-21-generic [...]
We will need to extract it using extract-vmlinux:
$> extract-vmlinux vmlinuz-6.11.0-21-generic > vmlinuxWith those two components ready, we can now run btf2json to create the symbol file as so:
$> btf2json --btf [vmlinux path] --map [System.map path] --banner "[output of banners]" | xz -c > linux-6.11.jsonWe also need to patch the symbol scheme as showcased in the project repo to make Volatility accept a BTF scheme:
diff --git a/volatility3/schemas/schema-6.2.0.json b/volatility3/schemas/schema-6.2.0.json
index 1f388005..65a6f5c6 100644
--- a/volatility3/schemas/schema-6.2.0.json
+++ b/volatility3/schemas/schema-6.2.0.json
@@ -105,7 +105,7 @@
       "properties": {
         "kind": {
           "type": "string",
-          "pattern": "^(dwarf|symtab|system-map)$"
+          "pattern": "^(btf|symdb|dwarf|symtab|system-map)$"
         },
         "name": {
           "type": "string"
It’s worth remembering that this project/methodology is at very early stages, with hopes to be able to dynamically create symbols from arbitrary memory dumps without needing the debug kernel nor any kernel download at all. Also, some issues arose when creating an ISF for recent Fedora Kernels, but your luck may vary.
Closing and acknowledgements
And there we have it. Two (and a half) ways to create symbols for Linux memory dumps that might come in handy in your next CTF. Also, a huge thank you to the Volatility maintainers for ratifying this, and being a real joy to work with.